Have you ever printed a document or design only to be frustrated that black colors looked more like a dark gray than a rich true black? If so, we’re going to cover details that will make it simple to fix the issue and avoid similar frustrations in the future by getting true black in CMYK color mode. It’s easy to accomplish, you just need to use the correct settings.
RGB vs. CMYK
There are two different color modes that are the most common choices in graphic design: RGB and CMYK. RGB stands for red, green, blue and is used when you’re designing for a screen or monitor. If you’re working on images that will be used on a website or viewed on a mobile device or some other type of screen, RGB is the appropriate color mode to use. When you’re working in RGB, any color that you use will be created with different combinations of red, green, and blue.
CMYK stands for cyan, magenta, yellow, and black. The “K” is used for black to avoid confusion with blue. Printers use ink in these four different colors, so CMYK is the color mode of choice when you’re designing something to be printed, like a brochure or business card. CMYK true black for printing is easy with the settings shown below.
True Black in CMYK for Printing
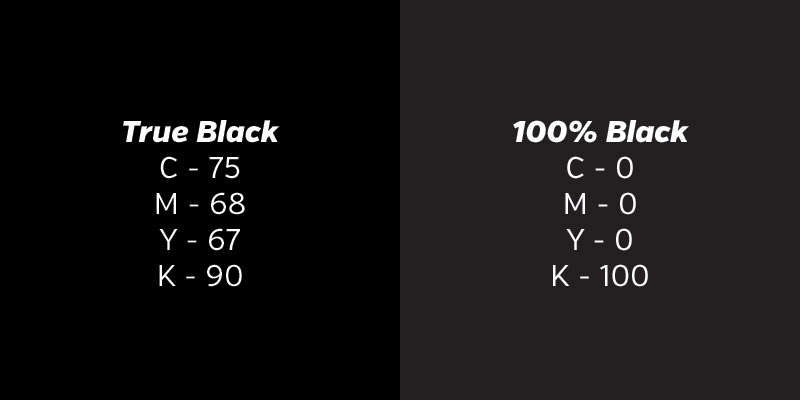
If you’re designing in CMYK and you want something to be black, it might seem logical that you would use a color that is 100% black and uses ink of no other colors. However, this will result in something that resembles a dark gray when it’s printed. This is because colors look slightly different on screen than they do when printed on paper. You’ll get a darker, rich black color by including the right amount of cyan, magenta, and yellow as well.
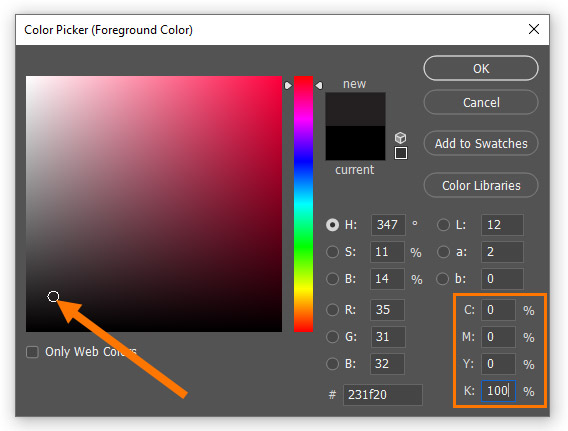
The colors in CMYK are represented by 4 different numbers that indicate the amount of ink that will be used from cyan, magenta, yellow, and black (in that order). If you use 100% black it would be C:0, M:0, Y:0, K:100. The image below from Photoshop shows the color created with this setting. As you can see, the color picker is not in the very bottom left corner where it should be for true black. Instead, it’s a shade of dark gray.
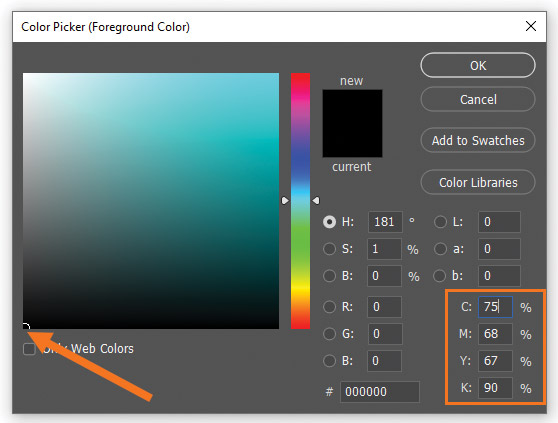
To get true black that looks deep and rich when printed, you should use C:75, M:68, Y:76, K:90. Take a look at the image below and you’ll notice that the color picker is all the way in the bottom left corner, which indicates that this is true black in CMYK.
Although these images are taken from Photoshop, the same situation applies when you’re working in CMYK in other design software or vector editing apps.
Get millions of stock images and videos at the best price
Unlimited access. No attribution required. Starts at just $9/month.

It’s also a good idea to check with your lab or printer to see if they have specific recommendations for the CMYK color that should be used for true black. Their recommendation may be slightly different than what’s provided in this article, based on the specific printers that they use.
Pro Tip: Be sure that all of the blacks match throughout your design. You don’t want some to be true black and others to be a few shades lighter.
To learn more about designing for print, please see How to Prepare a Digital Art File for Print.
Final Thoughts on True Black in CMYK for Printing
At first, it may seem difficult or impossible to get true black in CMYK for printing. However, by simply using the color settings shown here, you’ll get a rich black that looks exactly the way you want it to look. Regardless of whether you’re using Illustrator, Photoshop, or some other application, the process is the same.
Lead image by supernatone.