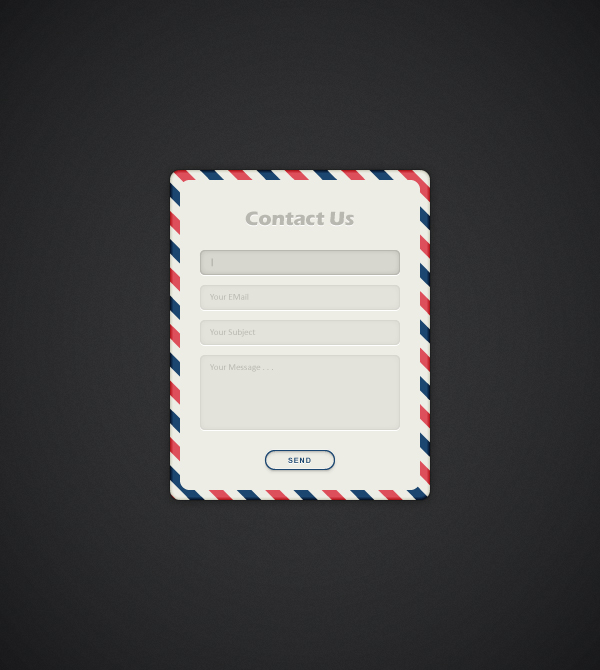
In this tutorial, you’ll learn how to create a simple contact form using Adobe Illustrator. We’ll begin with some basic tips, and we’ll work with the Appearance panel, too. You’ll also learn about sleek text fields and subtle call-to-action buttons. Finally, we’ll use the Type Tool to experiment with fonts and the Drop Shadow effect. Let’s get started!
Tutorial Details
- Program: Adobe Illustrator CC
- Difficulty: Beginner-Intermediate
- Topics Covered: Basic Tools and Effects, Pattern Building and the Appearance panel
- Estimated Completion Time: 30 minutes
Final Image
Below is the final image we’ll be creating:
Step 1
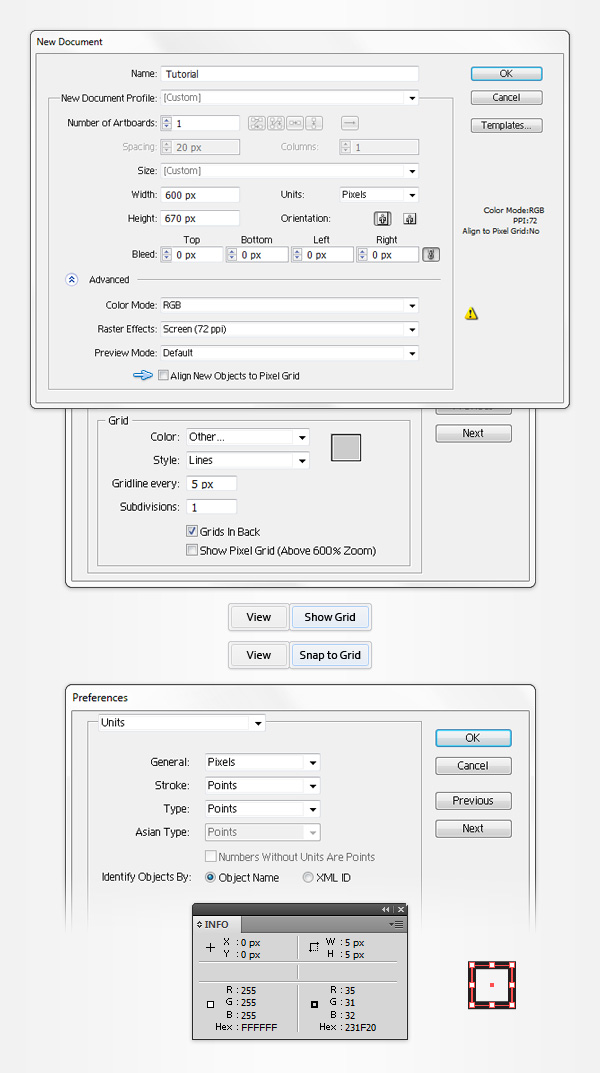
Hit Command + N to create a new document. Select Pixels from the Units drop-down menu, enter 600 in the width box and 670 in the height box then click on the Advanced button. Select RGB, Screen (72ppi) and make sure that the Align New Objects to Pixel Grid box is unchecked before you click OK.
Enable the Grid (View > Show Grid) and the Snap to Grid (View > Snap to Grid). For starters, you will need a grid every 5px, so simply go to Edit > Preferences > Guides > Grid, enter 5 in the Gridline every box and 1 in the Subdivisions box.
You should also open the Info panel (Window > Info) for a live preview of the size and position of your shapes. Don’t forget to set the unit of measurement to pixels from Edit > Preferences > Units > General. All these options will significantly increase your work speed.
Step 2
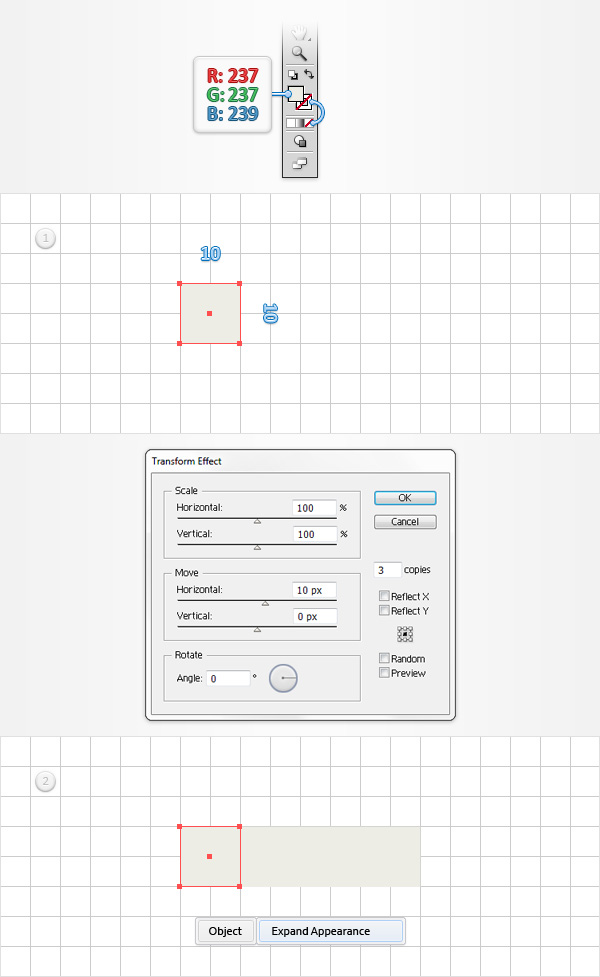
Pick the Rectangle Tool (M) and focus on your Toolbar. Remove the color from the stroke, and then select the fill, and set its color at R=237 G=237 B=239. Move to your Artboard and simply create a 10px square, the Snap to Grid should ease your work.
Make sure that this little shape is selected and go to Effect > Distort & Transform > Transform. Enter the properties shown in the image below, then click OK and go to Object > Expand Appearance.
Get millions of stock images and videos at the best price
Unlimited access. No attribution required. Starts at just $9/month.
Step 3
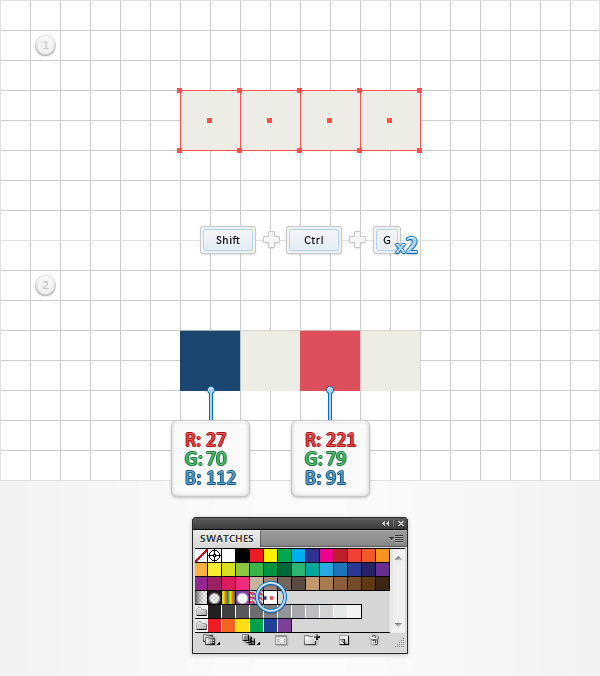
Focus on the Layers panel (Window > Layers), then select the existing group and hit Shift + CTRL + G twice to Ungroup it. In the end, you’ll have four 10px squares. Select the first one and set the fill color at R=27 G=70 B=112; then, select the third one and set the fill color at R=221 G=79 B=91.
Reselect all four squares and simply drag these shapes inside the Swatches panel (Window > Swatches) to save them as a pattern. Once you can see that new pattern inside the Swatches panel, you can delete the four squares from your Artboard.
Step 4
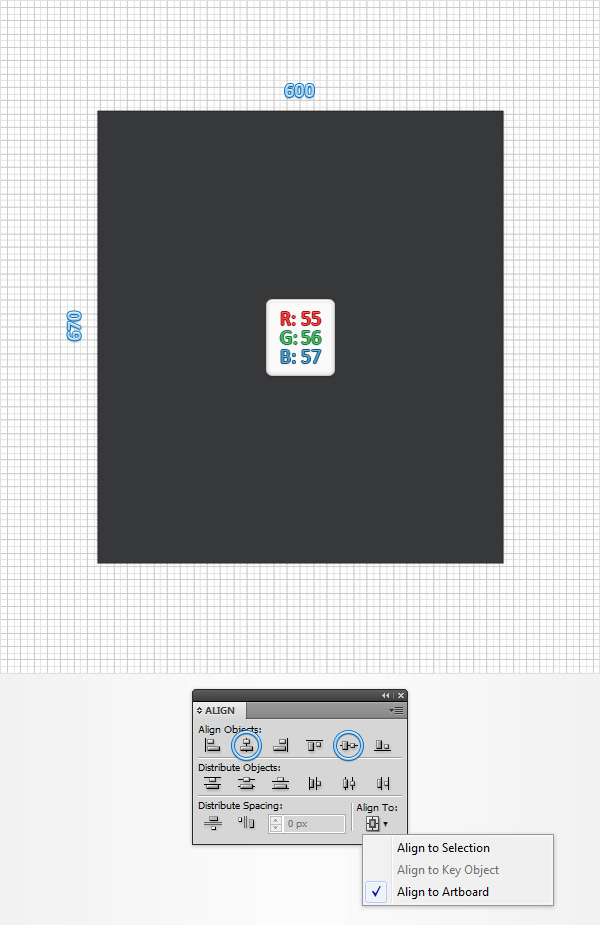
Using the Rectangle Tool (M), create a 600 x 670px shape and fill it with R=55 G=56 B=57. Next, you need to center this dark rectangle.
Select it and open the Align panel (Window > Align). Set the aligning to Artboard (if you can’t see the “Align To” section shown below, open the fly-out menu and go to Show Options.) Then, simply click the Horizontal Align Center and Vertical Align Center buttons. This should center your rectangle.
Step 5
Make sure your dark rectangle stays selected, and open the Appearance panel (Window > Appearance). Add a second fill using the Add New Fill button (pointed by the little, blue arrow in the following image). Select this new fill, open the Gradient panel (Window > Gradient), and simply click on the gradient thumbnail to add the default black to white linear gradient.
Keep focusing on your Gradient panel, and open the Type drop down menu and select Radial. Then, move to the gradient colors. Select the right slider and set the color at R=25 G=26 B=27, then select the left slider, set the color at R=55 G=56 B=57, and lower its Opacity to 0%.
Make sure that this fill stays selected, and then go ahead grab the Gradient Tool (G). Focus on your Artboard and stretch that gradient (like the image below).
Return to the Appearance panel and, using that same Add New Fill button, add a third fill for your rectangle. Select it, set the color at black, keep focusing on the Appearance panel, then click on the little arrow to see the attributes used for this new fill.
Click on that “Opacity” piece of text, change the Blending Mode to Multiply, set the Opacity at 10%, and go to Effect > Artistic > Film Grain. Enter the properties shown in the following image and click OK.
Step 6
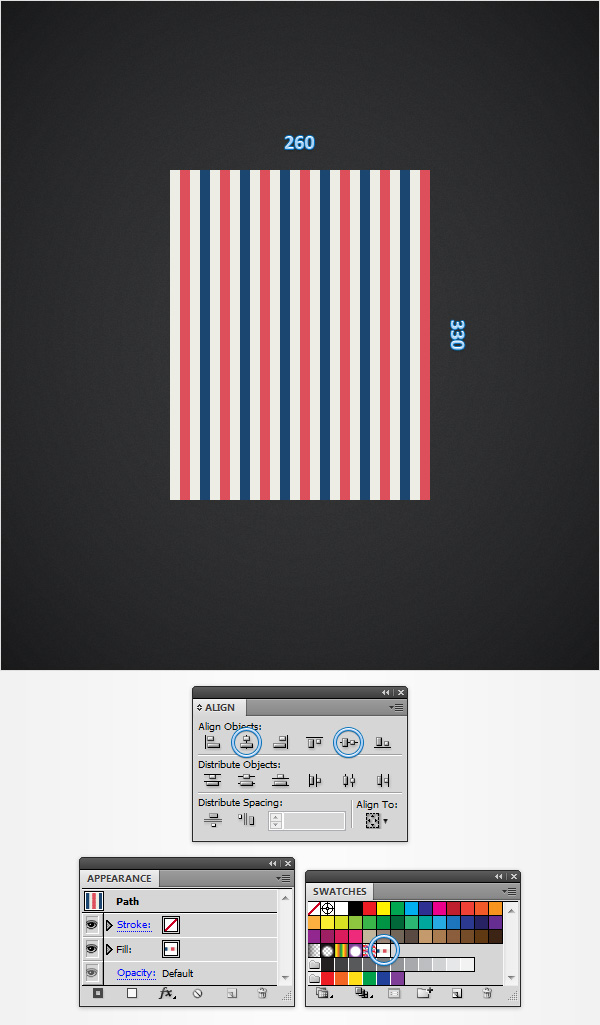
Using the Rectangle Tool (M), create a 260 x 330px shape, fill it with your saved pattern and center it using the Horizontal Align Center and Vertical Align Center buttons from the Align panel.
Step 7
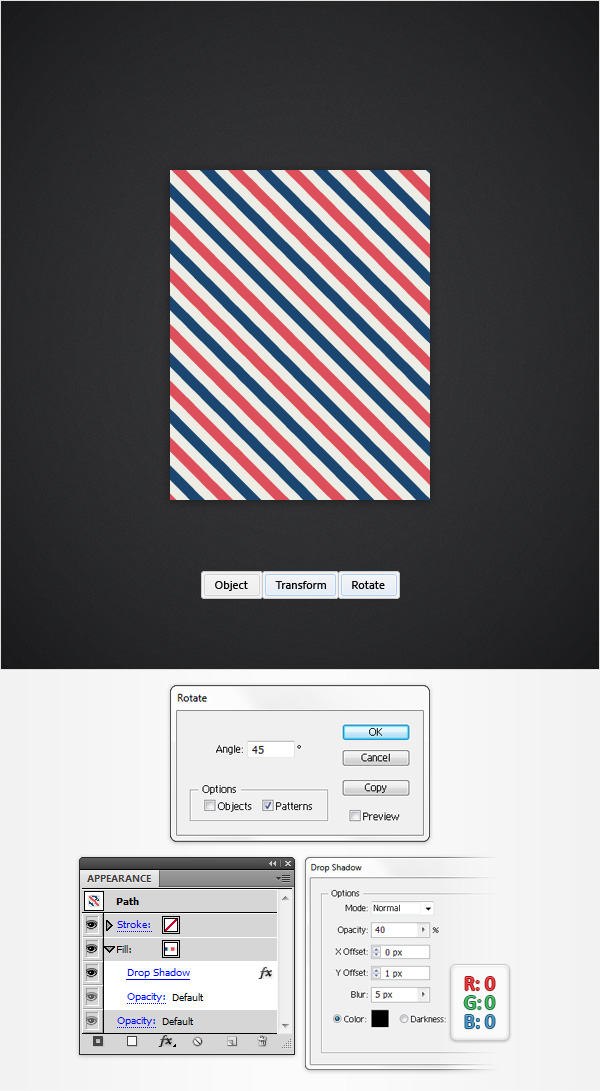
Make sure that your patterned rectangle is selected, focus on the Appearance panel, and select the existing fill and Object > Transform > Rotate. Uncheck the Objects box, make sure that the Patterns box is checked, enter a 45 degrees angle, click OK and go to Effect > Stylize > Drop Shadow. Enter the properties shown in the following image and click OK.
Step 8
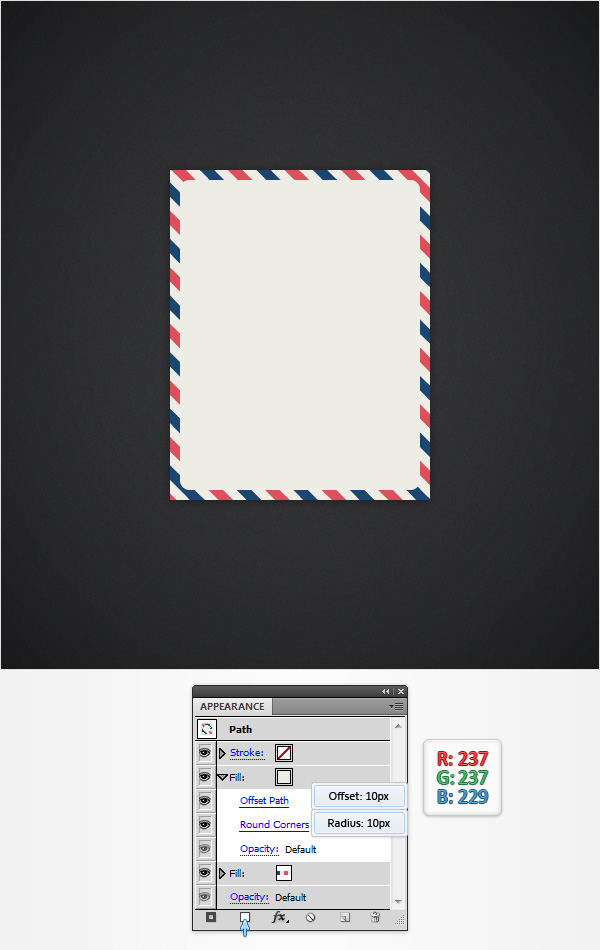
Make sure that your patterned rectangle is still selected, then focus on the Appearance panel. Go ahead and add a second fill and select it. Set the color at R=237 G=237 B=239 and go to Effect > Path > Offset Path. Enter a 10px Offset, click OK and go to Effect > Stylize > Rounded Corners. Enter a 10px radius and click OK.
Step 9
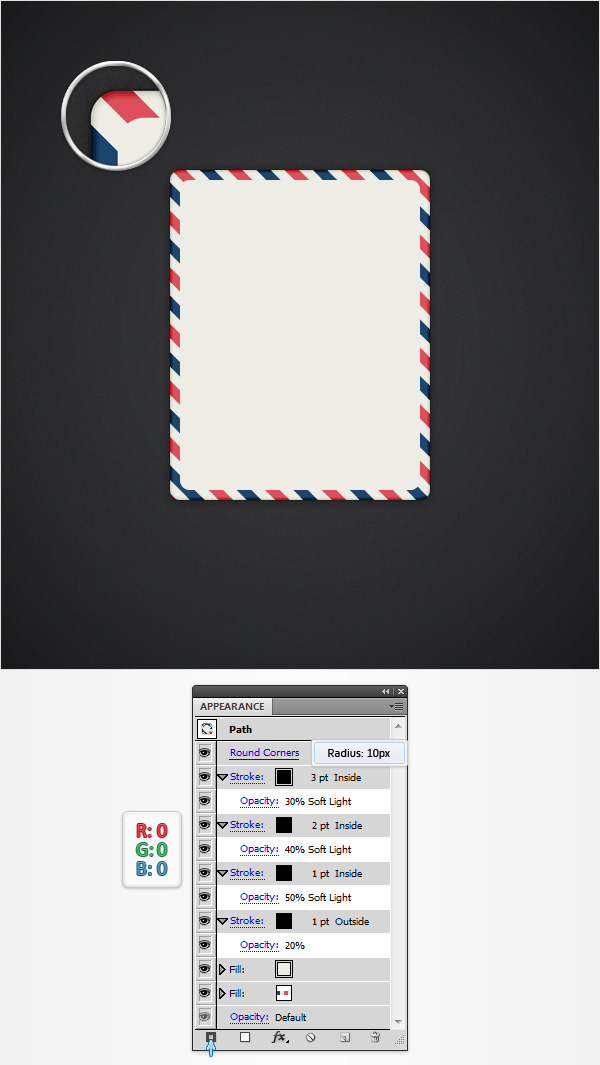
Make sure your patterned rectangle stays selected, focus on the Appearance panel, and add a black stroke and select it. Set the size at 1pt, then align it to outside and lower the Opacity to 20%.
Return to the Appearance panel and add a second black stroke for your shape using the Add New Stroke button (pointed by the little, blue arrow in the following image). Select this new stroke, set the size at 1pt, align it to inside, lower the Opacity to 50%, and change the Blending Mode to Soft Light.
Keep focusing on the Appearance panel and add a third black stroke. Select it, set the size at 2pt, align it to inside, lower the Opacity to 40% and change the Blending Mode to Soft Light. While you’re still inside the Appearance panel, add a fourth black stroke and select it. Set the size at 3pt, align it to inside, lower its Opacity to 30% and change the Blending Mode to Soft Light.
Finally, select the entire path (simply click on the “Path” piece of text from the top of the Appearance panel) and go to Effect > Stylize > Rounded Corners. Enter a 10px radius and click OK.
Step 10
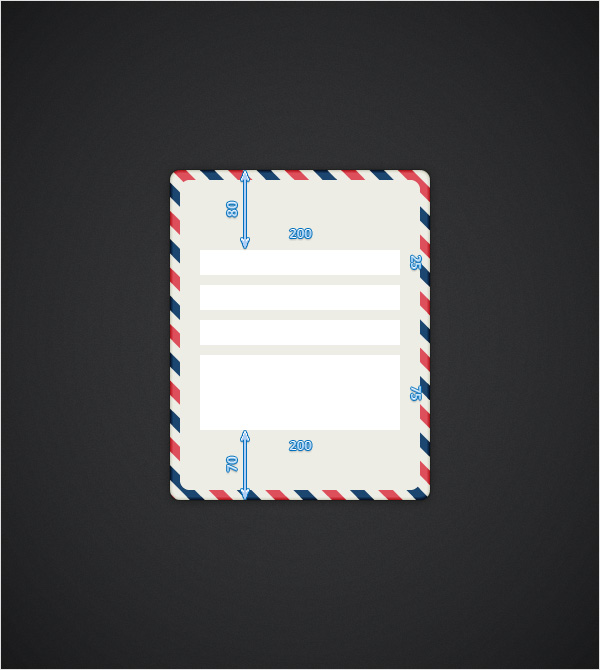
Using the Rectangle Tool (M), create three, 200 x 25px shapes and a 200 x 75px rectangle. Place these new shapes as shown in the following image and set the fill color at white (for now).
Step 11
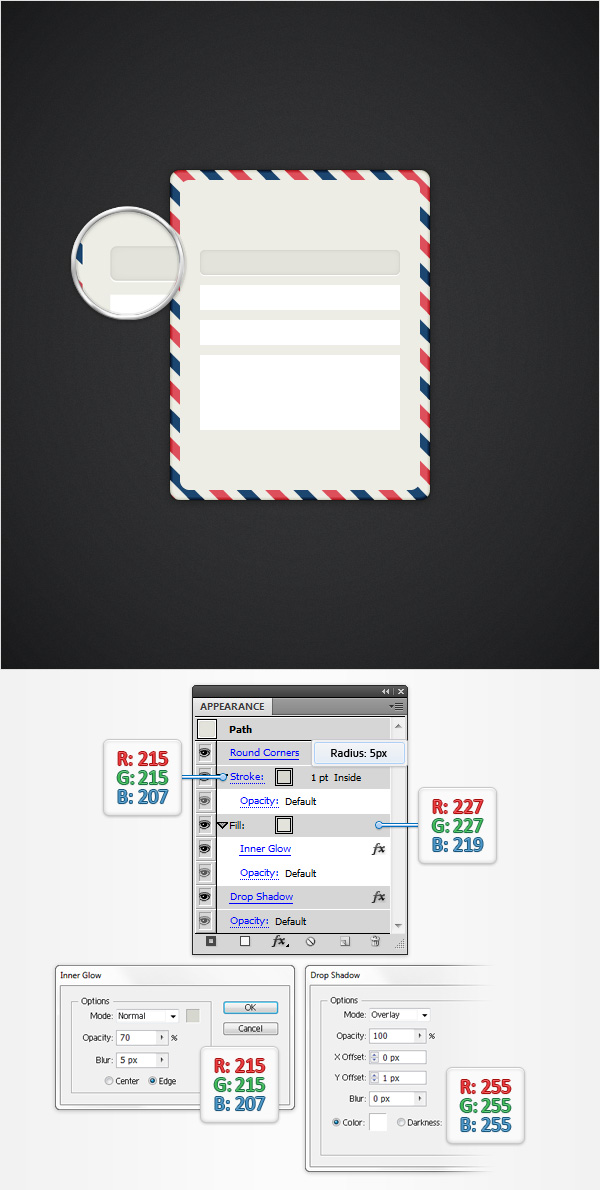
Select the top, white rectangle and focus on the Appearance panel. Select the existing fill, replace the white with R=227 G=227 B=219 and go to Effect > Stylize > Inner Glow. Enter the properties shown in the following image, click OK and return to the Appearance panel.
Add a 1pt stroke, align it to inside and set the color at R=215 G=215 B=207. Keep focusing on the Appearance panel, select the entire path and go to Effect > Stylize > Rounded Corners. Enter a 5px radius, click OK and go to Effect > Stylize > Drop Shadow. Enter the attributes shown in the following image and click OK.
Step 12
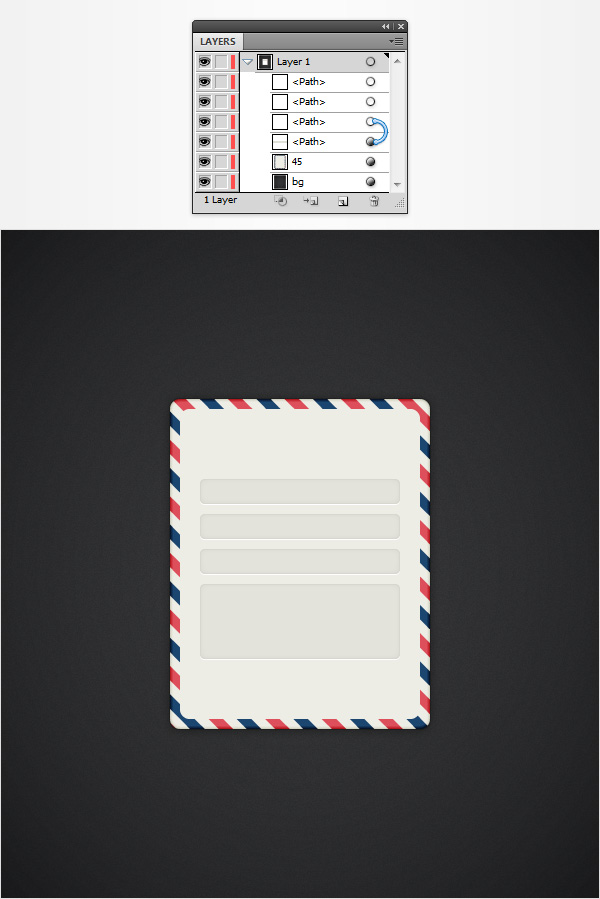
Next, you need to copy the properties used in the previous step (for the rectangle), and paste them onto the remaining white rectangles. Here is how you can easily do it:
Go to the Layers panel, focus on the right side and you’ll notice that every shape comes with a little circle. It’s called a target icon.
Hold the Alt key from your keyboard, then click on the target icon (for the rectangle edited in the previous step) and drag it onto the target icons for the white rectangles. Then, your image should look like the one below. These four rounded rectangles will be the text fields.
Step 13
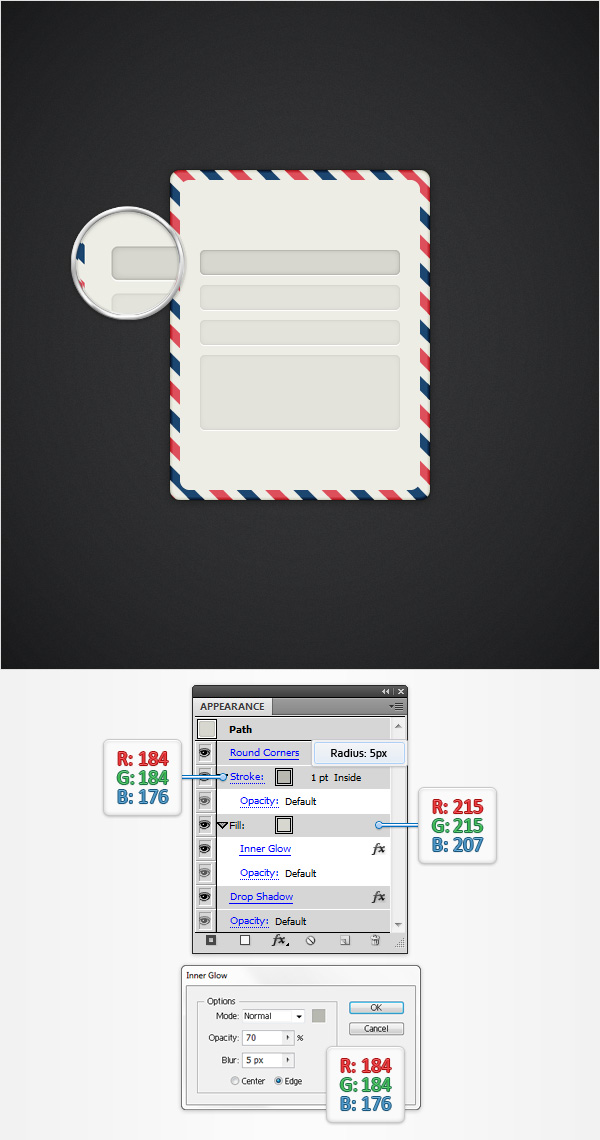
Select your top text field shape and focus on the Appearance panel. Select the bottom fill and set the color at R=215 G=215 B=207.
Select the top fill and set the color at R=184 G=184 B=176. Then open the existing Inner Glow effect and enter the attributes shown in the following image. This is how an active text field will look like.
Step 14
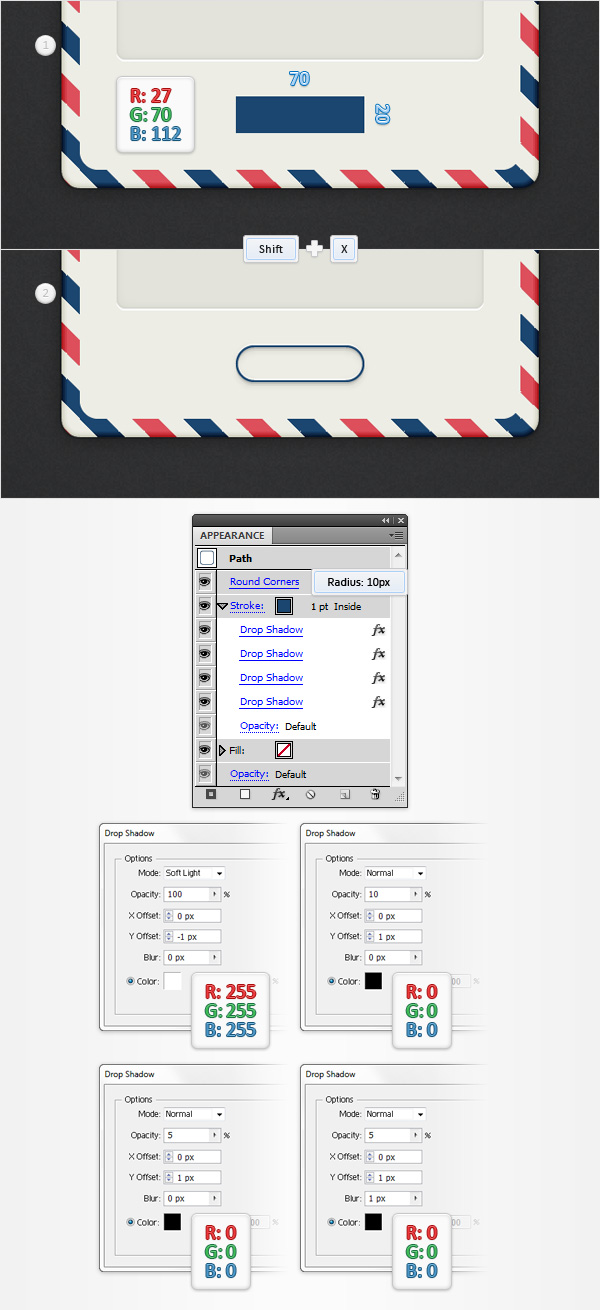
Using the Rectangle Tool (M), create a 70 x 20px rectangle, set the fill color at R=27 G=70 B=112 and place it as shown in the first image. Make sure that this blue rectangle stays selected and hit Shift + X to transfer the color properties from the fill to the stroke.
Move to the Appearance panel, and select that blue stroke. Align it to the inside and go to Effect > Stylize > Drop Shadow. Enter the properties shown in the top, left window (in the following image), click OK, and go again to Effect > Stylize > Drop Shadow. Enter the properties shown in the top, right window, click OK and go once again to Effect > Stylize > Drop Shadow. Enter the properties shown in the bottom, left window, click OK and go one more time to Effect > Stylize > Drop Shadow. Enter the properties shown in the bottom, right window and click OK.
Step 15
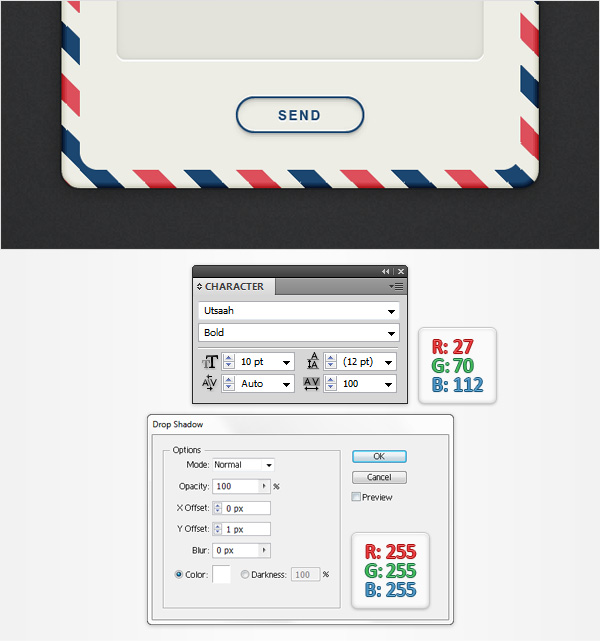
Using the Type Tool (T), add the “SEND” piece of text, set the color at R=27 G=70 B=112 and place it as shown in the image below. Use the Utsaah font, make it Bold, set size at 10pt and the tracking at 100 (like in the photo below). Then, go to Effect > Stylize > Drop Shadow. Enter the properties shown in the following image and click OK.
Step 16
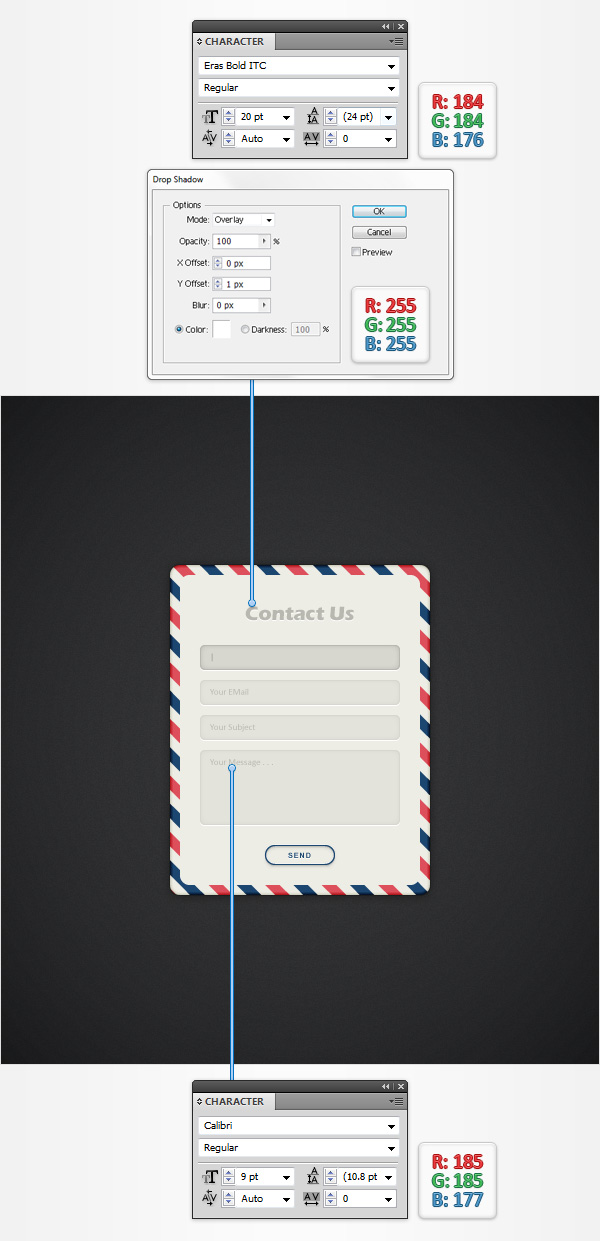
Make sure that the Type Tool (T) is still active, add the “Contact Us” piece of text, set the color at R=184 G=184 B=176 and place it in the top center. Use the Eras Bold ITC font, set size at 20pt and go to Effect > Stylize > Drop Shadow.
Enter the properties shown in the following image and click OK. Finally, add the subtle pieces of text from the text fields. Use the Calibri font, set the size at 9pt and the color at R=185 G=185 B=177.
And We’re Done!
I hope you’ve enjoyed this tutorial. Now you can create this contact form or one with some unique touches!


